TJL #2: How to set up a StackNavigator in React-native

Hi friends,
Welcome back to Today Jan Learned (TJL) #2. In this newsletter I share a new lesson every day, so stay tuned. Today’s lesson comes from here. Today Jan Learned how to set up a StackNavigator in React-native.

Why do we need navigation anyway?
Every app has to handle screen-to-screen transitions (also called routing or navigation). React-native originally had a built-in navigation API but that was quickly removed in favour of the library React-navigation. So! We are going to set up a StackNavigator example in React-native using the React-navigation library.
How to set up a StackNavigator
To set up a simple StackNavigator in React-native we are going to use the React-native library React-navigation. Make sure you installed all the dependencies.
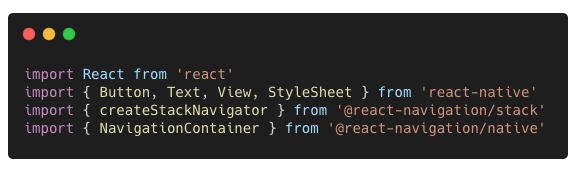
These are the imports we need:
Button, Text, View, and StyleSheet from react-native
createStackNavigator from @react-navigation/stack
NavigationContainer from @react-native/native
Then, the first step is to create a <NavigationContainer>.

In this NavigationContainer is where we will put all our Navigation … stuff.
In code that looks something like this.

The next step is to initialise the Root (main) Navigator with Root = createStackNavigator() and put it in the NavigationContainer.
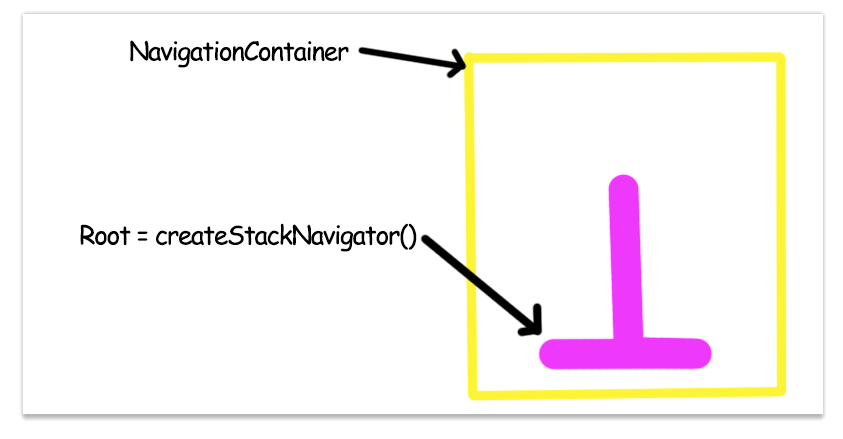
Which looks something like this. Don’t worry about the name and component parts yet.

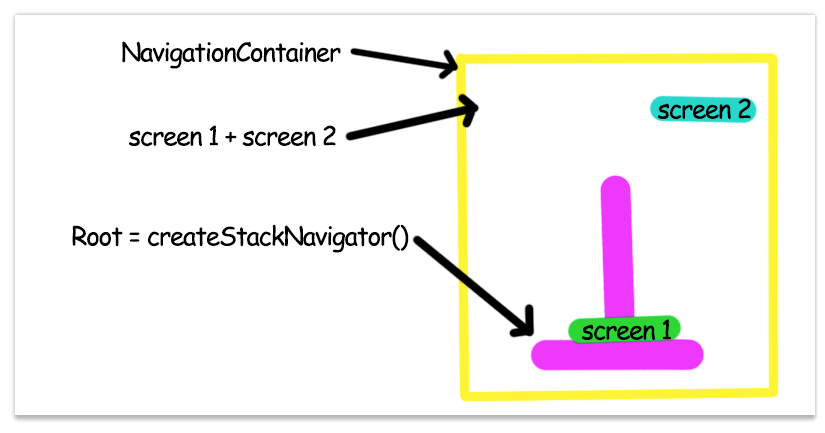
And then finally we add Screen 1 and Screen 2, which are just React components returning some JSX.

In code that looks something like this:

The reason I drew the StackNavigator in such a weird way is because this is how it kind of works. A great analogy for the StackNavigator is this wooden toy thing.

Because what we can do now with screen 1 and screen 2 is to push and pop these screens off and on the stack. That is why it is called the Stack Navigator.
Let’s push screen 1 on the Stack
Now we see screen 1 on the app. What if we now push screen 2 to the stack?

Cool! Now we see screen 2. How do we get back to screen 1 now? Simply by removing screen 2 (popping it off)

Cool! That’s how it works! That’s how you set up a StackNavigator in React-native.
Now what?
I challenge you to build your own StackNavigator! React-native can be scary, but once you understand the concepts and have the building blocks it suddenly becomes way more approachable. I’m learning React-native too and writing about it is my way of learning. I hope you enjoyed this and feel free to reach out to me with any questions or topics you would like to see discussed!
Anyway, that’s it! Today Jan Learned how to set up a StackNavigator in React-native.
Thank you for much for reading. See you next time!
Bonus
Here’s stuff that didn’t make the cut, but I still want to include!
What makes navigation in React-native difficult?
There are several reasons why correctly implementing navigation is difficult in React-native:
Navigation works differently on all platforms. iOS uses View Controllers whereas Androids uses Activities.
Navigation APIs don’t really correspond to “Views”, we will solve this with screen components later.
Navigation on mobile is different than that on the web. In general web navigation is stateless (using REST APIs) while on mobile it is stateful. The history of the user is stored so that you can press back and go to the previous screen.
Thankfully the library React-navigation solves almost all of these problems for us!
Flashcards
Here are some questions to test your understanding of this StackNavigator setup:
What do we call the component that component houses the StackNavigator?
What function initialises the StackNavigator?
Can you visualise how a StackNavigator works with a drawing?